모델의 정확도를 높이기 위해서 이미 학습해 놓은 텐서플로의 모델을 사용하여 처리하는 방법(전이학습)을 사용합니다.
TensorFlow Hub and Transfer Learning
TensorFlow Hub는 사용할 수 있는 이미 훈련된 TensorFlow 모델의 온라인 리포지토리입니다. 이러한 모델은 있는 그대로 사용하거나 전이 학습에 사용할 수 있습니다.
전이 학습은 기존의 훈련된 모델을 취하여 이를 확장하여 추가 작업을 수행하는 과정입니다. 여기에는 가능한 다른 출력을 얻기 위해 최종 레이어를 추가 및 재교육하는 동안 모델의 대부분을 변경하지 않고 그대로 두는 것이 포함됩니다.
우리는 둘 다 할 것이다.
여기에서 TensorFlow Module Hub에서 사용 가능한 모든 모델을 볼 수 있습니다.
Concepts that will be covered in this Colab
1.예측을 위해 TensorFlow Hub 모델을 사용합니다.
2. Dogs VS Cats 데이터셋을 위해 텐서 플로우 허브 모델을 사용한다.
3. TensorFlow Hub를 사용하여 간단한 전이 학습을 수행합니다.
Imports
전에 본 적이 있는 정상적인 import 부분들입니다. 새로운 것은 위에 설치된 텐서플로우_허브를 가져오는 것입니다.
import tensorflow as tf
import matplotlib.pylab as plt
import tensorflow_hub as hub
import tensorflow_datasets as tfds
from tensorflow.keras import layers
import logging
logger = tf.get_logger()
logger.setLevel(logging.ERROR)
Part 1: Use a TensorFlow Hub MobileNet for prediction
이 부분에서는 훈련된 모델을 가지고 케라스에 실어서 시험해 볼 것입니다.
사용할 모델은 MobileNet v2입니다(그러나 tfub.dev의 tf2 호환 이미지 분류기 URL의 모든 모델이 작동합니다).
Download the classifier
MobileNet 모델을 다운로드하고 이를 이용하여 Keras 모델을 만듭니다. MobileNet은 3색 채널(RGB)에 224 × 224 픽셀의 이미지를 기대하고 있습니다.
CLASSIFIER_URL ="https://tfhub.dev/google/tf2-preview/mobilenet_v2/classification/2"
IMAGE_RES = 224
model = tf.keras.Sequential([
hub.KerasLayer(CLASSIFIER_URL, input_shape=(IMAGE_RES, IMAGE_RES, 3))
])
Run it on a single image
MobileNet은 ImageNet 데이터 집합에 대해 교육되었습니다. ImageNet은 1000개의 다른 출력 클래스를 가지고 있으며, 그 중 하나는 군복입니다. 이미지넷의 일부가 아닌 군복을 담고 있는 이미지를 보고, 우리 모델이 군복이라고 예측할 수 있는지 알아보자.
import numpy as np
import PIL.Image as Image
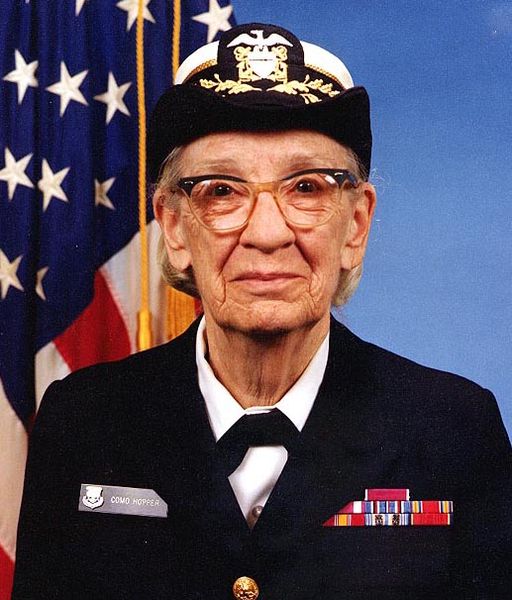
grace_hopper = tf.keras.utils.get_file('image.jpg','https://storage.googleapis.com/download.tensorflow.org/example_images/grace_hopper.jpg')
grace_hopper = Image.open(grace_hopper).resize((IMAGE_RES, IMAGE_RES))
grace_hopper

사진의 인물이 옷을 착용하고 있다.
grace_hopper = np.array(grace_hopper)/255.0
grace_hopper.shape

모델에서는 항상 처리할 이미지 배치를 원합니다. 그래서 여기서는 배치 차원을 추가하고 예측을 위해 이미지를 모델에 전달합니다
result = model.predict(grace_hopper[np.newaxis, ...])
result.shape

결과는 로짓의 1001 요소 벡터로, 이미지에 대한 각 클래스의 확률을 평가합니다.
따라서 argmax를 사용하여 최상위 클래스 ID를 찾을 수 있습니다. 하지만 어떻게 이것이 실제로 어떤 클래스인지, 특히 ImageNet 데이터셋의 클래스 ID가 군복이나 다른 것을 나타내는지 알 수 있을까요?
predicted_class = np.argmax(result[0], axis=-1)
predicted_class

Decode the predictions
ImageNet 데이터셋에서 예측_class가 무엇인지 확인하려면 ImageNet 레이블을 다운로드하고 모델이 예측한 행을 가져옵니다.
[ ]
labels_path = tf.keras.utils.get_file('ImageNetLabels.txt','https://storage.googleapis.com/download.tensorflow.org/data/ImageNetLabels.txt')
imagenet_labels = np.array(open(labels_path).read().splitlines())
plt.imshow(grace_hopper)
plt.axis('off')
predicted_class_name = imagenet_labels[predicted_class]
_ = plt.title("Prediction: " + predicted_class_name.title())

사진의 옷을 군복으로 판별하였다.
빙고, 모델이 군복을 정확히 예측했습니다.!
Part 2: Cats vs. Dogs dataset에 TensorFlow Hub models 사용하기
이제 우리는 전체 MobileNet 모델을 사용하여 Dogs vs. Cats 데이터셋에 어떻게 수행할 수 있는지를 알아보겠습니다.
Dataset
TensorFlow 데이터 세트를 사용하여 Dogs 대 Cats 데이터 세트를 로드할 수 있습니다.
(train_examples, validation_examples), info = tfds.load(
'cats_vs_dogs',
with_info=True,
as_supervised=True,
split=['train[:80%]', 'train[80%:]'],
)
num_examples = info.splits['train'].num_examples
num_classes = info.features['label'].num_classes

실행결과
도그 vs 고양이 데이터 집합의 이미지들이 모두 같은 크기는 아닙니다.
for i, example_image in enumerate(train_examples.take(3)):
print("Image {} shape: {}".format(i+1, example_image[0].shape))

따라서 MobileNet(224, 224)이 예상하는 해상도로 모든 이미지를 다시 포맷해야 합니다.
여기서 .repeat() 및 steps_per_epoch는 필요하지 않지만 shuffle-buffer를 한 번만 콜드 스타트하면 되므로 페이지당 ~15초를 절약합니다
def format_image(image, label):
image = tf.image.resize(image, (IMAGE_RES, IMAGE_RES))/255.0
return image, label
BATCH_SIZE = 32
train_batches = train_examples.shuffle(num_examples//4).map(format_image).batch(BATCH_SIZE).prefetch(1)
validation_batches = validation_examples.map(format_image).batch(BATCH_SIZE).prefetch(1)
Run the classifier on a batch of images
우리의 모델 오브젝트는 여전히 ImageNet에서 교육받은 전체 MobileNet 모델이므로 1000개의 출력 클래스를 가질 수 있습니다. ImageNet에는 많은 개와 고양이가 포함되어 있습니다. 그렇다면 우리의 Dogs 대 고양이 데이터 집합인 우리의 이미지를 예측할 수 있는지 알아보겠습니다.
image_batch, label_batch = next(iter(train_batches.take(1)))
image_batch = image_batch.numpy()
label_batch = label_batch.numpy()
result_batch = model.predict(image_batch)
predicted_class_names = imagenet_labels[np.argmax(result_batch, axis=-1)]
predicted_class_names

그 라벨은 개와 고양이의 이름과 일치하는 것 같다. 이제 Dogs vs Cats 데이터 세트의 이미지를 플롯하여 그 옆에 ImageNet 레이블을 붙입니다.
plt.figure(figsize=(10,9))
for n in range(30):
plt.subplot(6,5,n+1)
plt.subplots_adjust(hspace = 0.3)
plt.imshow(image_batch[n])
plt.title(predicted_class_names[n])
plt.axis('off')
_ = plt.suptitle("ImageNet predictions")

실행결과
Part 3: Do simple transfer learning with TensorFlow Hub
이제 TensorFlow Hub를 사용하여 전이 학습을 수행하겠습니다.
전이 학습을 통해 우리는 이미 훈련된 모델의 일부를 재사용하고 모델의 최종 계층 또는 여러 계층을 변경한 다음 해당 계층을 자체 데이터 세트로 재교육합니다.
TensorFlow Hub는 완전한 모델 외에도 마지막 분류 계층 없이 모델을 배포한다. 이것들은 쉽게 전이 학습을 하는 데 사용될 수 있다. 이 과정의 후반부에서 이 모델을 가지고 TensorFlow Lite를 사용하여 모바일 장치에 배치하기 때문에 MobileNet v2를 계속 사용할 것입니다. 여기서 tfub.dev의 모든 이미지 기능 벡터 URL이 작동합니다.
Dogs vs Cats 데이터 세트도 계속 사용할 예정이므로 이 모델의 성능을 처음부터 새로 만든 모델과 비교할 수 있습니다.
TensorFlow Hub(최종 분류 계층이 없는)의 부분 모델을 feature_extrator라고 합니다. 이 용어에 대한 이유는 입력을 여러 특징을 포함하는 레이어에 완전히 가져가기 때문이다. 따라서 최종 확률 분포를 생성하는 것을 제외하고 이미지의 내용을 식별하는 데 대부분의 작업을 수행했습니다. 즉, 이미지의 기능을 추출했습니다.
URL = "https://tfhub.dev/google/tf2-preview/mobilenet_v2/feature_vector/2"
feature_extractor = hub.KerasLayer(URL,
input_shape=(IMAGE_RES, IMAGE_RES,3))
이것을 통해 이미지 묶음을 실행해보고, 최종 모양을 봅시다. 32는 영상의 수이고, 1280은 TensorFlow Hub에서 부분 모델의 마지막 층에 있는 뉴런의 수입니다.
feature_batch = feature_extractor(image_batch)
print(feature_batch.shape)

형상 추출기 계층의 변수를 동결하여 훈련이 최종 분류기 계층만 수정하도록 한다.
feature_extractor.trainable = False
Attach a classification head
이제 허브 층을 tf.keras로 감싸세요.순차적 모형 및 새 분류 계층을 추가합니다.
model = tf.keras.Sequential([
feature_extractor,
layers.Dense(2)
])
model.summary()

실행결과
Train the model
이제 다른 모델과 마찬가지로 컴파일을 먼저 호출한 후 적합하게 이 모델을 교육합니다.
model.compile(
optimizer='adam',
loss=tf.keras.losses.SparseCategoricalCrossentropy(from_logits=True),
metrics=['accuracy'])
EPOCHS = 6
history = model.fit(train_batches,
epochs=EPOCHS,
validation_data=validation_batches)

수행결과
97%의 검증 정확도를 얻을 수 있다는 것을 알 수 있습니다. 정말 대단합니다. 이는 이전 학습에서 83%의 정확도를 얻을 수 있었던 모델에 비해 크게 개선된 것입니다. 이러한 차이점의 이유는 MobileNet이 오랜 시간에 걸쳐 전문가들에 의해 신중하게 설계된 후 대규모 데이터 세트(ImageNet)에 대한 교육을 받았기 때문입니다.
TensorFlow Hub와 동일하지는 않지만 여기서 Keras에서 MobileNet을 생성하는 방법을 확인할 수 있습니다.
교육 및 검증 정확도/손실 그래프를 표시해 보겠습니다.
acc = history.history['accuracy']
val_acc = history.history['val_accuracy']
loss = history.history['loss']
val_loss = history.history['val_loss']
epochs_range = range(EPOCHS)
plt.figure(figsize=(8, 8))
plt.subplot(1, 2, 1)
plt.plot(epochs_range, acc, label='Training Accuracy')
plt.plot(epochs_range, val_acc, label='Validation Accuracy')
plt.legend(loc='lower right')
plt.title('Training and Validation Accuracy')
plt.subplot(1, 2, 2)
plt.plot(epochs_range, loss, label='Training Loss')
plt.plot(epochs_range, val_loss, label='Validation Loss')
plt.legend(loc='upper right')
plt.title('Training and Validation Loss')
plt.show()

여기서 좀 궁금한 것은 실행 시작부터 종료까지 검증 성능이 교육 성과보다 낫다는 점입니다.
그 한 가지 이유는 검증 성능이 이 시기의 끝에서 측정되지만 훈련 성능은 이 시기의 평균값이기 때문이다.
하지만 더 큰 이유는 이미 Dogs and Cats 이미지에 대해 훈련되어 있는 MobileNet의 많은 부분을 재사용하고 있기 때문입니다. 훈련을 수행하는 동안 네트워크는 여전히 훈련 이미지에 대해 이미지 확대를 수행하지만 검증 데이터 세트에는 수행되지 않습니다. 즉, 검증 데이터 집합의 일반 이미지에 비해 교육 이미지를 분류하기가 더 어려울 수 있습니다.
Check the predictions
그림을 다시 만들려면 먼저 클래스 이름의 순서 목록을 가져옵니다.
[ ]
class_names = np.array(info.features['label'].names)
class_names

Run the image batch through the model and convert the indices to class names.
[ ]
predicted_batch = model.predict(image_batch)
predicted_batch = tf.squeeze(predicted_batch).numpy()
predicted_ids = np.argmax(predicted_batch, axis=-1)
predicted_class_names = class_names[predicted_ids]
predicted_class_names

이제 실제 레이블과 예측 레이블을 살펴보겠습니다.
print("Labels: ", label_batch)
print("Predicted labels: ", predicted_ids)

실행결과
plt.figure(figsize=(10,9))
for n in range(30):
plt.subplot(6,5,n+1)
plt.subplots_adjust(hspace = 0.3)
plt.imshow(image_batch[n])
color = "blue" if predicted_ids[n] == label_batch[n] else "red"
plt.title(predicted_class_names[n].title(), color=color)
plt.axis('off')
_ = plt.suptitle("Model predictions (blue: correct, red: incorrect)")

단지 몇개만 분류가 틀렸네요.
'IT와 과학 > AI' 카테고리의 다른 글
| 텐서플로 2.0 시작하기: 초보자용 (1) | 2022.12.03 |
|---|---|
| AI 도구 및 프레임워크 목록 (1) | 2022.11.05 |
| 시각화로 컨볼루션 네트워크 이해 (0) | 2021.05.15 |
| 컨볼루션 신경망(CNN)을 위한 포괄적인 가이드 (0) | 2021.05.06 |
| 기계학습 : 과적합을 방지하는 방법 6가지 (0) | 2021.05.06 |


